Marketing ops consulting & execution
 Sales ops consulting and execution
 Dashboards and analytics
.svg) HubSpot
HubSpot
.svg) Salesforce
Salesforce
.svg) Marketo
Marketo
 Google Analytics 4
 Blogs
Blogs
 Case studies
 Ebooks
 Infographics
 RevXpert academy
 RevOps unplugged show
 RevOps bulletin
.svg) About us
About us


Introduction
Your team is drowning in manual tasks, your workflows are rigid and brittle, and every time you want to scale a campaign or respond to a new GTM motion, it’s like reinventing the wheel. Sound familiar?
For revenue leaders, CXOs, and marketing heads trying to move fast and drive predictable growth, not using AI in your HubSpot workflows means missed opportunities, wasted hours, and an ops team constantly playing catch-up.
This blog dives into how AI can unlock smarter, scalable workflows in HubSpot, so you can automate complexity, adapt in real time, and finally turn your CRM from a bottleneck into a growth engine.
Why are businesses betting big on AI-powered workflows?
- GTM alignment: AI-powered workflows ensure that marketing, sales, and customer success are on the same page with the customer journey.
- Better cross-platform orchestration: They help sync sales, marketing, service, and ops automatically.
- Smarter workflow triggers: Companies can adjust processes quickly in response to demand surges or market changes.
- Greater operational efficiency: AI automates repetitive tasks through workflows like data entry and approvals, allowing teams to focus on more marketing strategy.
- Error reduction: Human error is reduced by automating complex tasks, flagging issues instantly, and leveraging historical patterns to avoid repeat problems
- Faster decision-making: AI-enabled workflows accelerate decision-making by automating real-time actions and eliminating delays from manual reviews or approvals.
How to use AI to create HubSpot workflows?
✅ Click on “Copilot” in the top right of the screen in your HubSpot account and type “create a workflow”.
You’ll notice that the Breeze Copilot has created a sample workflow for you.
✅ Then, click on the name of the workflow. This will take you to the workflow. You’ll notice that there is a CTA called “Use AI to generate”. Use this to generate a trigger.

✅ Now, you can enter your requirement and criteria for it. Then click on “Generate trigger”.

✅ If you think it’s good to go, click on “Keep trigger”, or else, can update your requirements.
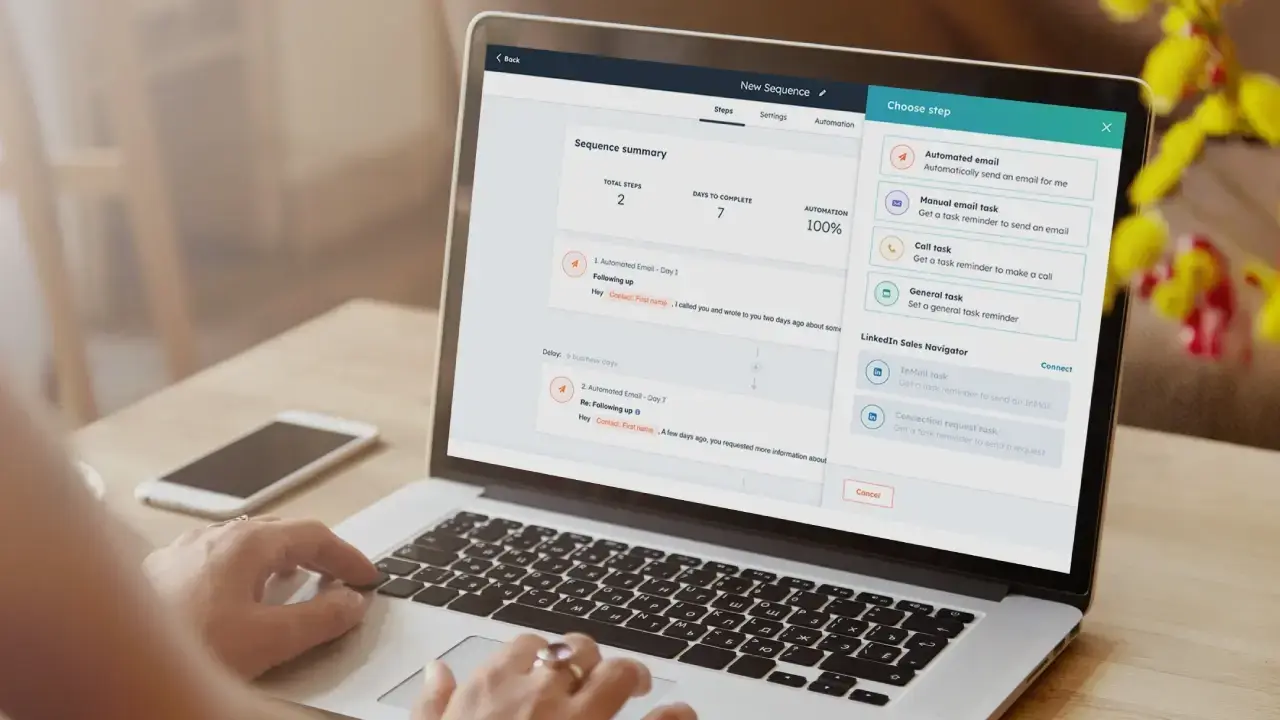
Click on the “+” icon to add the actions you want to perform.
✅ Next, all you have to do is describe your workflow, and AI will generate the actions.

In this case, the description added, as shown in the picture, is, “Send an email after 5 days and add the contact to the list and create a task”.
✅ As shown, AI has created the workflow according to the input. Click on “Keep actions” to keep it. You have the option to modify the workflow further.

✅ You can add an email, choose the list in which you want to add contacts, add details for the task, etc., and modify them further.

✅ A task can be added on how and when you would like to follow up with the contact and set the custom date. Click on “save”.

✅ Now you’re good to go. If you want to revert the changes or modify something, use the “review” button on the top right corner of the screen. Otherwise, turn the workflow on, and you’re all set.


👉 Watch our exclusive LMS video to learn how to create AI-powered workflows in HubSpot like a pro - click here to dive in!
It’s a wrap
Whether you’re battling siloed data, clunky processes, or inconsistent customer journeys, manual fixes just don’t scale. Workflows in HubSpot aren’t just a tech upgrade; they’re a competitive edge.
When done right, they unlock faster GTM execution, cleaner handoffs, and visibility that drives revenue-forward decisions.
But the implementation is where most teams get stuck.
To be a pro at implementation, join RevXpert Academy and dive into our library of short, actionable videos created exclusively by our RevOps experts - designed to accelerate your learning and fuel rapid growth. 🚀
Sign up here and start learning smarter right away!